I studied every piece of research about vacuum bell therapy. I came up with a general plan you can follow and what to expect during the treatment. Some of the recommendations are made by Mr. Eckart Klobe himself.
In contrast, others come from my personal experience and the experiences of others I encountered in forums that improved their deformities with the vacuum bell.
This blog post will clarify how to use the vacuum bell during therapy.
WHAT TO EXPECT DURING THE FIRST THERAPY

It is recommended to do the first vacuum bell therapy under medical supervision. If you choose to overlook this and start the treatment in your home, I advise you to have a relative or friend next to you.
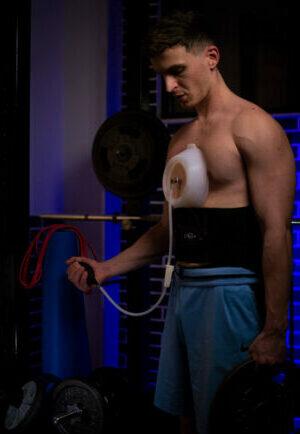
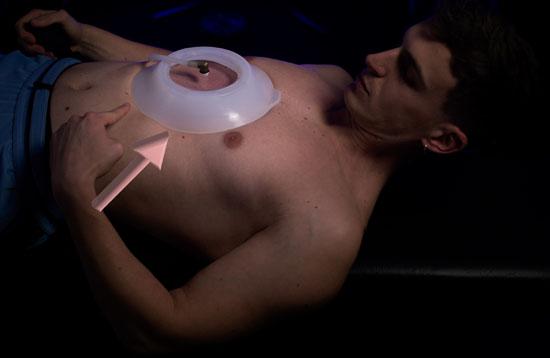
You start by lying down to set the suction cup on your chest. Please place it tightly and comfortably.
Slowly pump and increase the vacuum pressure, as there shouldn’t be any considerable pain. Feel how the inverted chest starts to lift to the transparent glass of the device.
At this point, it is entirely natural to have mixed feelings. You’ll feel hopeful, but at the same time, you’ll feel slight discomfort. Pump and apply negative pressure to the point where you feel a minor ache.
Then, carefully try to stand up and walk around your room. Notice how the device stays on your chest without falling. That’s the power of negative pressure.
HOW LONG DOES IT TAKE TO APPLY THE DEVICE FOR THE FIRST THERAPY

According to Eckart Klobe, 15 minutes of wearing is enough for the first time. Your goal isn’t to correct the deformity after one single therapy. The purpose of the first session is to get familiar with the power of the vacuum bell.
To finish the first therapy, it is good to do a follow-up Medical check-up. A lot of us are starting vacuum bell therapy on our own. There is nothing wrong with that. Even Eckart Klobe corrected his deformity independently.
TIMETABLE
FIRST 4 WEEKS
While you apply the vacuum bell during the first four weeks, you will need to get used to the feeling of your sternum being pulled close to the viewing window of the device.
This can be expected in two weeks if the patients are younger or if the deformity is mild. Older patients or patients with more severe pectus excavatum can do this in about four weeks.
If you’re very uncomfortable or feel pain, you shouldn’t force this. Do it gradually and slowly. Don’t force the lifting of the sunken chest to the transparent window in just a few days.
According to Eckart Klobe, it should take two to four weeks. That’s because lifting the chest too fast can temporarily cause unnecessary stability losses in the rib cage.
AFTER 2 MONTHS
After two months of continuously applying the vacuum bell every day, with the purpose of the breastbone to come close to the transparent window of the device, the sternum of most adults and teenagers will stay elevated on its own after each therapy.
The elevation will last a few hours until it returns to the concave position. Comparatively, children will experience chest elevation for just a few minutes before it falls back to the initial position. That’s because the chest wall of older patients is stiffer.
WITHIN 3 MONTHS
You should expect the pectus excavatum deformity and poor posture to improve significantly.
Also, the chest will remain flattened between one treatment and the next than when you started the treatment. According to Eckart Klobe, this improvement was noted to be 0.39” or 1 cm in many cases.
AFTER 4 MONTHS
The patient will have much more physical endurance. Lung capacity and heart functioning will improve. You’ll experience a deeper breath because of the chest expansion.
There is still progress in enhancing the deformity, but the progress is slower than in the first three months. The positive thing is that the patients are used to the everyday vacuum bell appliance after four months.
They aren’t bothered by the device and don’t even think about it when applied. According to Eckart Klobe, in this stage, the progress is usually 0.39”, or 1 cm a month. This is the progress until the deformity is repaired.
PHASES OF TREATMENT
To fix pectus excavatum with vacuum bell therapy, you must go through three stages. The stages will define the frequency of the vacuum bell application.
Generally, the more you apply the vacuum bell, the “softer” your breastbone will become. After several months of daily vacuum bell application, the treatment won’t be as efficient as when you started.
Because of that, you will need to take rest days in between vacuum bell applications. That will help you maintain the effectiveness of the treatment.
PHASE 1
During the first phase, you will observe rapid improvement in your deformity. You’ll be highly motivated to continue the treatment because of the success.
The breastbone will elevate, and your bodily appearance will change. This will help you both physically and mentally. For representative purposes, this stage will last until your breastbone is raised to roughly 20 mm in depth.
If your breastbone is sunken deeper than 20 mm, I recommend applying the vacuum bell daily. If you notice skin rashes in the area where you use the vacuum bell, you should apply the device for three consecutive days, followed by one day of rest. One day of rest will give your skin time to heal.
PHASE 2
The second phase starts when the deformity improvement slows, but you can still see weekly improvements. Usually, this stage begins when your sternum depth is about 20 mm and lasts until it improves to 10 mm.
I recommend you apply the vacuum bell for two consecutive days and one day off at this stage. During this phase, your skin will get more itchy and sensitive. You need to practice skincare more intensively.
PHASE 3
In the third phase, the progress will grind to a halt. You will begin to lose motivation in this stage because you’ll see improvement only for several weeks or months.
It will start when you go below 10 mm and last until you correct the pectus excavatum deformity. If satisfied with the results, you can stop the vacuum bell treatment midway through this stage and live happily with your flat chest.
You will need to apply the vacuum bell device every other day during this stage. If you’re less motivated but still want to continue the therapy, you can even take a week off every month.
It will be enough for your skin to heal completely and gain the lost motivation to defeat the deformity forever.
HOW LONG TO WEAR THE VACUUM BELL IN A DAY
At the beginning of the therapy, it is enough to apply the vacuum bell two times a day for about 30 minutes. The frequency and intensity should be increased later in the treatment. Your body needs to get used to the vacuum bell during the first weeks of therapy.
Learn to listen to your body. Don’t force yourself to wear the vacuum bell for about 8 hours in the first week. If you do that, you’ll feel resentment about using the device. You can’t form a habit this way.
According to Mr. Klobe, starting slowly and increasing the duration with time is always recommended. Start applying the vacuum bell for about 30 minutes a day when starting. Then, gradually increase the period.
HOW MUCH TO PUMP
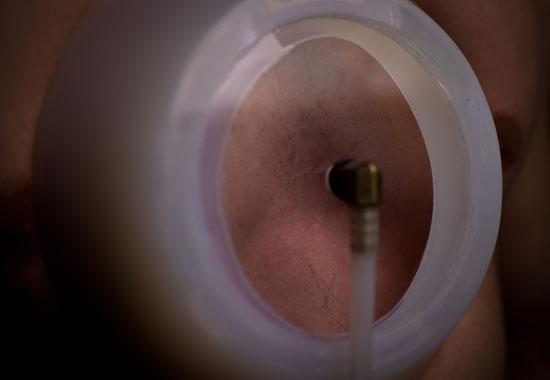

Always pump until your inverted chest becomes flat. You can see this through the see-through window of the suction bell. Consider this as a “warm-up” for your chest.
Wait 5 minutes until the chest relaxes and gets used to this new elevated position. After the 5 minutes pass, you should squeeze the sucking pump three times. Then, repeat and pump every 5 minutes.
I always wait until the unpleasant sensation diminishes. After about 20 minutes, the hollow chest almost touches the suction cup’s window.
At this point, pumping doesn’t do anything. It can’t elevate further because that is as far as possible. I recommend sitting in this state for about 40 minutes when your chest reaches this point.
After 60 minutes, let air in and finish the successful 1-hour therapy. Listen to your body. If you feel sharp pain, stop immediately.
HOW TO MAINTAIN NEGATIVE PRESSURE WITHOUT PUMPING
I stumbled upon many people complaining about a pressure maintenance problem. They had to pump continually to maintain the elevated breastbone to the window.
This isn’t very pleasant if you try to do therapy while sleeping. During the day, you can pump to maintain the negative pressure.
However, it is a whole different story at night. I had this exact problem while sleeping. As soon as I woke up, I noticed that the suction cup had stayed loose on my chest.
TWO PROBLEMS TO FIX
FIRST PROBLEM
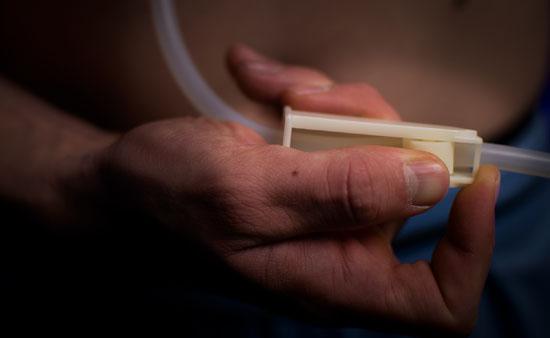
The first problem is caused by the pump, mainly because the valve is not tight. After pumping and reaching the desired chest elevation, take the pump off. At the same time, squeeze the hose tightly so no air will come out.
Most vacuum bells usually come with a silicone plug designed for this purpose. If it doesn’t include one, any circular item made of metal, plastic, or silicone with a diameter of around 7mm will work. You can grind it out to become cone-shaped. Then, it would be much easier to insert it.
Stick the silicone plug (stopper) in the hose, and you’re good to go. After that, the device should work correctly and stay tight without pumping!
SECOND PROBLEM
The second problem is with the suction cup positioning on your chest. If you try to sleep with the vacuum bell applied, you should lower it on your chest.
Contrary, if you place it in a higher position on your chest, the air will slowly get drawn out of the device. You can’t hear the air getting out.
THE BOTTOM LINE
In this article, I wrote about the phases of vacuum bell treatment and what to expect during the first few months of therapy. You’ll be motivated by the fantastic progress in the first months.
Then, the progress will slow down, but the deformity will still improve. It would be best if you were consistent in applying the device.
If needed, you can take a few days’ breaks if you experience skin problems.
Thank you for reading!
3 Sources
- Haecker FM, Sesia S. Vacuum bell therapy. Ann Cardiothorac Surg. 2016
Sep;5(5):440–9. - Instructions for use 2010 11 03 M7.pdf [Internet]. [cited 2022 Nov 24]. Available
from: https://www.grudina.ru/upload/Instructions%20for%20use%202010%2011%2003%20M7.pdf - Pectus Excavatum: Vacuum Bell Device (for Parents) - Nemours KidsHealth [Internet]. [cited 2022 Nov 24]. Available from: https://kidshealth.org/en/parents/vacuum-bell-device.html